

Estimated reading time: 7 minutes
TechnofluxAI WordPress Guide
How to Generate Images Inside WordPress With the WP AI Client
The WP AI Client gives WordPress developers a cleaner way to add AI image generation directly inside WordPress without forcing every plugin to build its own provider connection, API settings page, or custom AI workflow from scratch.
Quick Answer
To generate images inside WordPress with the WP AI Client, a plugin can send an image prompt through the WordPress AI Client API, receive the generated image result, save it into the Media Library, and attach it to a post, page, product, or custom workflow.
Why It Matters
AI image generation becomes much more useful when it lives inside the same place creators already write posts, edit pages, manage media, and publish content.
The Creator Problem
Most creators do not want to jump between five tools just to create one blog image. They write in WordPress, generate an image somewhere else, download it, rename it, upload it, add alt text, set it as a featured image, and then repeat the process for the next article.
What This Guide Explains
This article explains what the WP AI Client does, how AI image generation can fit into WordPress, what a basic plugin workflow looks like, and what developers should think about before adding image generation to a production site.
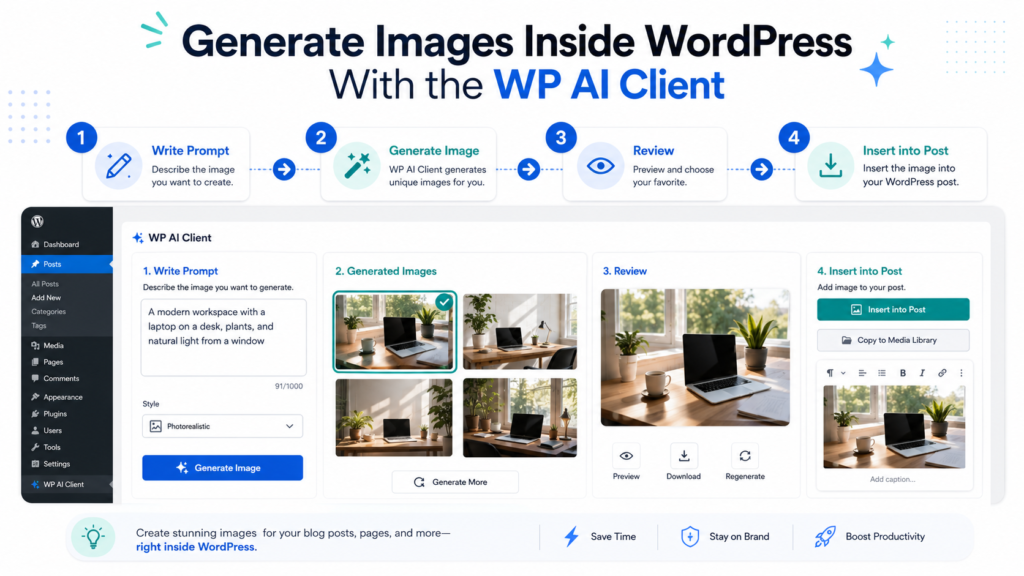
Main Tutorial
What the WP AI Client Does for Image Generation
The WP AI Client is a WordPress-side layer for working with generative AI models through a more consistent WordPress developer experience. Instead of every plugin building its own separate provider setup, the AI Client gives developers a shared way to request AI output from inside WordPress.
1. Prompt Input
The user enters a prompt such as “neon WordPress dashboard with AI image tools, dark background, clean creator workspace.” The plugin sends that prompt to the AI Client instead of managing the full provider request manually.
2. AI Client Request
The plugin asks the WP AI Client to generate an image result. The AI Client handles the common request pattern so the plugin can focus on the WordPress experience around the feature.
3. Media Library Output
After the image is generated, the plugin can save it to the WordPress Media Library, assign a file name, add alt text, and make it available for posts, pages, blocks, or featured images.
Basic Workflow: From Prompt to WordPress Image
A simple AI image generation feature inside WordPress usually follows the same path: collect a prompt, send it through the AI Client, receive the generated result, save the file, and connect the image to the creator’s content.
Step 1: Add a Prompt Field
The plugin needs a place where the user can describe the image. This could be a sidebar panel, a Media Library modal, a custom admin page, a post editor control, or a block setting.
Step 2: Sanitize the Prompt
Before sending the prompt, the plugin should sanitize user input, check permissions, and make sure only approved users can generate images.
Step 3: Request the Image
The plugin sends the prompt through the WP AI Client. A developer can structure this as a button click, AJAX action, REST endpoint, or editor-side workflow depending on the plugin design.
Step 4: Save the Image
Once the image file is returned, WordPress should store it properly in the uploads directory and register it as a Media Library attachment.
Step 5: Add Image Metadata
The plugin should add a useful title, caption, alt text, and description when possible. This makes the generated image easier to manage and better for accessibility.
Example Plugin Logic
if ( ! current_user_can( 'upload_files' ) ) {
    return new WP_Error( 'not_allowed', 'You do not have permission to generate images.' );
}

$prompt = sanitize_text_field( wp_unslash( $_POST['image_prompt'] ?? '' ) );

if ( empty( $prompt ) ) {
    return new WP_Error( 'missing_prompt', 'Please enter an image prompt.' );
}

$image_result = wp_ai_client_prompt( $prompt );

// Next: save the returned image into the WordPress Media Library,
// create attachment metadata, add alt text, and connect it to the post.
Production Advice
How to Make AI Image Generation Feel Native in WordPress
The best AI image tools inside WordPress should not feel like a separate app glued onto the dashboard. They should feel like part of the publishing workflow: simple prompt input, fast preview, clean Media Library storage, useful metadata, and enough control for creators to trust the result.
Keep the Interface Simple
Most users do not need a complicated AI studio inside WordPress. A prompt box, style options, preview area, regenerate button, and save-to-media button are enough for many publishing workflows.
Use Brand Presets
Presets help users generate consistent images. A site could offer styles like clean SaaS graphic, dark neon dashboard, minimal blog header, or product tutorial illustration.
Make Review Easy
Users should be able to preview an image before it becomes a featured image or appears in a post. AI output should support the creator, not silently publish on their behalf.
Common Mistakes to Avoid
Mistake 1: Saving Images Without Metadata
Generated images should not enter the Media Library with random names and empty alt fields. Good metadata makes the image easier to find, reuse, and manage.
Mistake 2: Ignoring User Permissions
Not every WordPress user should be able to generate images, spend provider credits, or upload new media. Tie generation access to the right WordPress capabilities.
Mistake 3: Making Prompts Too Vague
A prompt like “make a blog image” gives weak results. A prompt with subject, style, colors, mood, layout, and use case gives the model more useful direction.
Mistake 4: Forgetting Performance
AI generation should happen in the admin workflow, not slow down public pages. Once an image is generated and saved, the frontend should serve it like a normal WordPress image.
FAQ: WP AI Client Image Generation
Can WordPress generate AI images directly?
Yes. With the WP AI Client, developers can build plugin features that request image generation from inside WordPress and then save the result into normal WordPress workflows such as the Media Library or post editor.
Is the WP AI Client only for text?
No. The WP AI Client is designed for generative AI tasks, including text and image-related workflows.
Where should generated images be stored?
Generated images should usually be saved in the WordPress Media Library as standard attachments. This keeps them easy to reuse, edit, attach, optimize, and manage.
What makes a good WordPress AI image prompt?
A strong prompt includes the subject, purpose, visual style, color palette, format, mood, and where the image will be used.
Final Takeaway
The WP AI Client makes AI image generation inside WordPress feel more practical because it gives developers a shared foundation for connecting AI features to native publishing workflows.
The real win is not just creating images from prompts. The real win is creating images where the work already happens: inside the editor, inside the Media Library, inside the dashboard, and inside the content workflow that creators already understand.
TechnofluxAI
Practical AI for creators and website owners
Learn how to use AI, improve AI search visibility, build smarter workflows, and test what actually works.
Explore our other sites
TimewasterAI
— product reviews, buying guides, and useful finds.
Tina Trends
— fashion, beauty, pets, lifestyle, and fun discoveries.
Mistakenly Delicious
— simple recipes and practical cooking ideas.
Running a WordPress blog, I’ve tried a lot of these plugins and tools over the years. The trick for me is finding ones that don’t bloat the page or slow the site down. A fast web-based generator beats a heavyweight plugin any day when you’re just producing a featured image now and then.