

Estimated reading time: 8 minutes
TechnofluxAI Tutorial System
AI Screenshot Workflow for Better Tutorial Posts
A strong tutorial does more than explain steps. It shows readers exactly what to look for, where to click, what result to expect, and how to avoid mistakes. That is where a smart AI screenshot workflow can make your tutorial posts clearer, faster to create, and easier to trust.
Quick Answer
An AI screenshot workflow is a repeatable process for planning, capturing, organizing, annotating, optimizing, and placing screenshots inside tutorial posts. The goal is to help readers follow each step without confusion.
Why It Matters
Many tutorials fail because the screenshots feel random. A reader sees a button, dashboard, menu, or setting, but the article does not clearly connect the image to the next action.
The Reader Pain Point
Readers usually arrive at tutorial posts because they are stuck. They do not want vague advice. They want the exact screen, the exact setting, the exact button, and the exact result.
If your screenshots are missing, blurry, outdated, or poorly placed, the reader loses confidence fast. Even a well-written tutorial can feel incomplete when the visuals do not support the instructions.
What This Article Will Help You Build
You will learn how to create a practical AI-assisted screenshot workflow for tutorial posts. This includes planning screenshots before writing, naming files correctly, using AI to find missing visual gaps, writing better captions, and improving the final post for SEO and readability.
Suggested internal link: Connect this post to your AI blog writing workflow or tutorial content checklist.
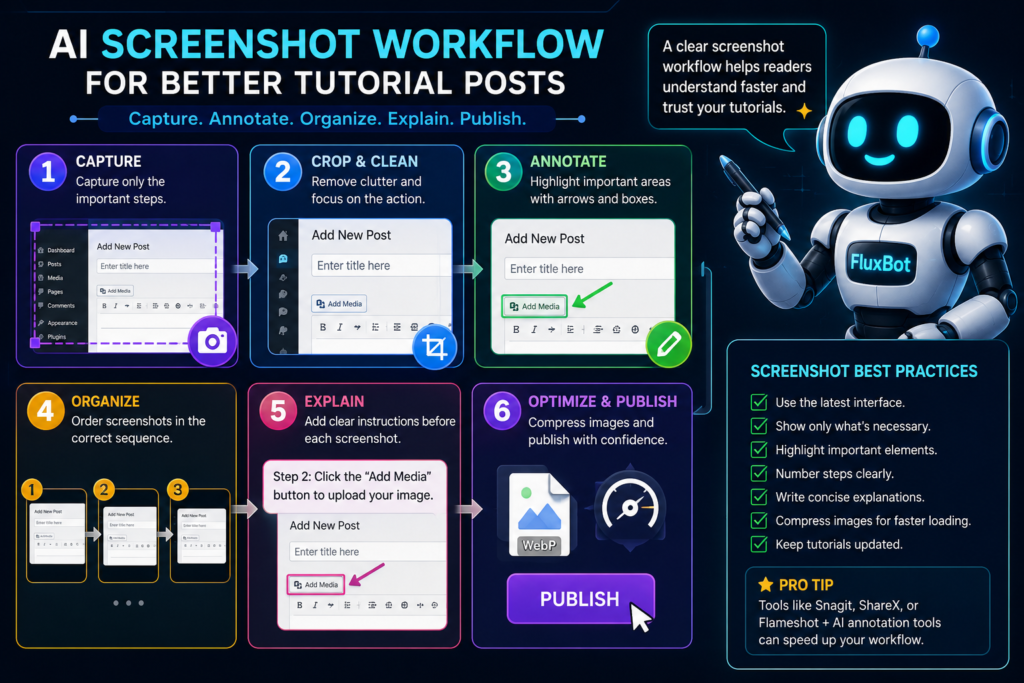
Main Workflow
How to Use AI Screenshots to Improve Tutorial Posts
The best tutorial screenshots are not added at the end. They are planned as part of the content structure. Each screenshot should answer a reader’s silent question: “What should I be seeing right now?”
Step 1: Map the Reader Journey
Before taking screenshots, list every action the reader must complete. Turn the tutorial into small moments: open the tool, find the menu, change the setting, confirm the result, and troubleshoot mistakes.
Step 2: Decide Which Steps Need Images
Not every step needs a screenshot. Add images where readers may hesitate, miss a button, misunderstand a setting, or need proof that they are on the right screen.
Step 3: Use AI to Find Visual Gaps
Paste your tutorial outline into an AI tool and ask where screenshots would reduce confusion. This helps you catch missing visuals before the article feels incomplete.
The Best Screenshot Types for Tutorial Posts
A better screenshot workflow starts with knowing which type of visual the reader actually needs. Some screenshots explain direction. Others confirm results. The strongest tutorials usually use a mix.
Navigation Screenshots
Show readers where to go next, especially when menus, tabs, or settings are easy to miss.
Before-and-After Screenshots
Help readers understand the difference between the starting point and the final result.
Confirmation Screenshots
Show the success screen, saved setting, published page, exported file, or completed result.
Error Screenshots
Explain what readers should do when something goes wrong or when a screen looks different.
A Practical AI Screenshot Workflow
1. Write the Tutorial Outline First
Start with the steps before taking screenshots. This keeps your visuals focused on the reader’s path instead of whatever images you happen to capture.
2. Mark Screenshot Moments
Add a note wherever a screenshot should appear. Use simple labels like “dashboard view,” “settings menu,” “export button,” or “final result.”
3. Capture Clean Screens
Remove distracting tabs, personal information, unrelated notifications, and messy browser clutter before capturing images. A clean screenshot helps the reader focus.
4. Use AI to Draft Captions
Give AI the step title and ask for a short caption that explains what the reader should notice. Then edit the caption so it matches the actual screen.
5. Add Helpful Annotations
Use arrows, boxes, highlights, or numbered markers only where they reduce confusion. Do not cover important interface details with oversized graphics.
6. Compress and Name Files Properly
Use descriptive file names before uploading. A file name like ai-screenshot-workflow-settings-menu.png is more useful than Screenshot-2026-07-27.png.
7. Review the Post on Mobile
Many readers follow tutorials on phones or tablets. Check whether screenshots are readable, captions are clear, and the step order still makes sense on a smaller screen.
Example: Weak Tutorial vs Strong Tutorial
Weak Version
“Go to settings and turn on the feature.” The article includes no screenshot, no menu label, and no confirmation that the reader completed the step correctly.
Stronger Version
“Open Settings, choose Content Preferences, and turn on Auto-Save Drafts.” The screenshot highlights the exact toggle and the caption explains what the enabled setting should look like.
Screenshot SEO Checklist
- Use descriptive image file names.
- Write alt text that describes the actual screenshot.
- Place screenshots near the step they explain.
- Compress images before uploading.
- Avoid screenshots with private information.
- Do not use blurry or cropped images that hide key details.
- Keep captions short and specific.
- Make sure screenshots still match the current interface.
- Use consistent image dimensions when possible.
- Check mobile readability before publishing.
Advanced Publishing Tips
How to Make Screenshot Tutorials Feel Professional
Better screenshots do not mean adding more images. They mean adding the right image at the right moment with enough context for the reader to keep moving.
Create a Screenshot Naming System
Use a predictable file structure like topic-step-number-description. This keeps your media library organized and makes future updates easier.
Update Screenshots on a Schedule
Tool interfaces change. Review your highest-traffic tutorial screenshots every few months so readers do not follow outdated visual instructions.
Use AI as a Visual Editor
Ask AI to review your step list and identify where screenshots, captions, warnings, or comparison visuals would make the tutorial easier to follow.
Common Screenshot Mistakes to Avoid
Adding Screenshots After the Article Is Finished
This often creates weak visual placement. Plan images while outlining so every screenshot has a clear purpose.
Using Images That Are Too Wide or Too Busy
A full dashboard screenshot can overwhelm readers. Crop around the important area when the full screen does not add value.
Forgetting to Hide Private Details
Remove names, emails, analytics, API keys, billing information, customer data, and private documents before publishing screenshots.
Writing Captions That Repeat the Paragraph
A caption should clarify the image, not duplicate the step. Tell readers what to notice in the screenshot.
FAQ: AI Screenshot Workflow for Tutorial Posts
How many screenshots should a tutorial post include?
Use enough screenshots to prevent confusion, but not so many that the article feels crowded. A good rule is to add an image whenever a reader may need visual confirmation.
Can AI create screenshots for tutorials?
AI can help plan, label, annotate, describe, and improve screenshots. For real software tutorials, use actual screenshots from the current interface whenever accuracy matters.
Should I use generated images instead of real screenshots?
Use generated images for concepts, featured images, and visual branding. Use real screenshots for step-by-step instructions, settings, menus, dashboards, and results.
What makes a tutorial screenshot useful?
A useful screenshot is clear, current, focused, and placed beside the step it explains. It should remove uncertainty instead of adding decoration.
Do screenshot captions help SEO?
Captions can improve readability and keep users engaged with the tutorial. They also help explain the image for readers who are scanning the page.
Final Takeaway
AI can make tutorial writing faster, but screenshots make tutorials easier to trust. When you combine AI planning with clean, accurate visuals, your posts become more useful for readers and stronger for search.
Build the screenshot workflow once, then reuse it for every tutorial post you publish.
Next Step
Before publishing your next tutorial, create a screenshot map beside your outline. Mark each step where the reader may need visual proof, then capture only the images that make the instructions easier to follow.
TechnofluxAI
Practical AI for creators and website owners
Learn how to use AI, improve AI search visibility, build smarter workflows, and test what actually works.
Explore our other sites
TimewasterAI
— product reviews, buying guides, and useful finds.
Tina Trends
— fashion, beauty, pets, lifestyle, and fun discoveries.
Mistakenly Delicious
— simple recipes and practical cooking ideas.

About the Author
Jon Hicks
Founder of TechnofluxAI.
I’m the creator behind TechnofluxAI, focused on breaking down powerful AI tools, emerging trends, and practical strategies to help creators and entrepreneurs stay ahead in a rapidly evolving digital world.
Follow TechnofluxAI for the latest AI tools & strategies